Zonos Checkout for Shopify
This powerful cross-border solution enhances your international customers’ shopping experience while removing the pains ecommerce retailers face when selling cross-border.
Features
Welcome international customers based on IP address with Zonos Hello upon site arrival.
Use your shipping carrier and shipping rate.
Allow customers to shop and settle in their local currency with Zonos Payments.
Get a complete landed cost at checkout (duties, taxes, & carrier fees).
Enable customers to complete checkout in their local language.
How it works
International customers add products to their cart (just like before) but will be redirected to Zonos Checkout to complete their order. The Zonos Checkout (designed to have your store’s look and feel), brings added functionality and flexibility not available with the Shopify Checkout. Add your carrier rates and custom shipping rules with ease. Your customers can complete the checkout process in their local language with localized address fields. Take advantage of abandoned cart emails that also use language translation and add custom messages, delivery times, and more.
When the purchase is complete, you can choose to have that order imported into Shopify or manage your orders from the Zonos Dashboard, where you can easily manage orders, print international shipping labels and custom documents, manage promo codes*, send email confirmations, and more.
Zonos can also take the worry out of international shipping compliance and fraud. Whether that may be handling item and country restrictions, notifying you of any possible matches against the consolidated screening list, or giving you the option of 100% fraud protection, Zonos keeps the control in your hands while mitigating the risk that can come with international sales.
*Promo codes - Shopify promo codes will not work inside Zonos Checkout; however, you can create promo codes using the Zonos Dashboard specific to your international customers.
Getting started
Contact a Zonos Sales rep - Please reach out to us for information on how to get started. Once we get an agreement, you can begin the installation process.
Installation - Install Checkout for Shopify if you haven’t already.
Landed Cost setup - Adjust how your landed cost is calculated.
Shipment rating setup - Connect carriers, modify service levels, and customize calculated rates.
Installation
The Zonos Checkout for Shopify plugin is a private listing not listed on the Shopify App Store. Hello is also included with this plugin.
Please follow the instructions on this page or in the app once you have downloaded the extension.
Any theme changes may “break” the current set-up. Please test once changes have been made to make sure functionality still remains.
Get the app
First, make sure you are logged in to your Shopify store.
Next, click here to install the Checkout plugin.
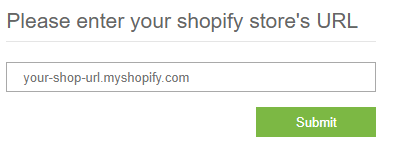
Paste your store domain in the following format: subdomain.shopify.com and click Submit.
You will be taken to the Shopify installation page. Click Install unlisted app.

Once you install the app, you will be taken to the Zonos/iGlobal app for Shopify page to begin configuration.
Configuration
On the Zonos/iGlobal app for Shopify page, choose the activation level you want for Zonos Hello. We suggest you start with Test Mode.

You can find your Zonos Store ID Number, Zonos API Key, and Zonos Hello credentials inside the Zonos Dashboard. (You may need to create a Zonos account with us, if you haven’t already.)
Go to https://dashboard.zonos.com/integrate to find your credentials.
Copy the required values over from the Dashboard, then click Save.
We recommend using your Shopify emails for customers; so the emails match the aesthetic of your store.
If you want to turn ON duty and tax quotes for Zonos Hello, check the boxes next to Enable Product Quote and Enable Cart Quote.
Make sure to Save after any settings changes.
In your Zonos/iGlobal app for Shopify page, at the top left - select Installation Instructions from the top menu. Make sure to keep this tab open for grabbing information.

Copy the
{% include 'iglobal' %}from this page.Right-click on the layout/theme.liquid link to open a new tab that will redirect you to the appropriate file.

You can also select Online Store > Select your current theme > Go to Actions > Edit Code.
In layout/theme.liquid file, paste the
{% include 'iglobal' %}code to the bottom of your theme.liquid file before the closing body tag (i.e.</body>). If you cannot see the closing body tag, try searching with CMD-f on a MAC or CTRL-f on Windows/Linux. If there is not a closing body tag, simply place the code right after the opening body tag. An example is shown below.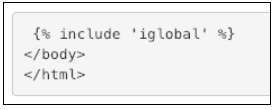
In a separate window, input the URL: yourdomain.myshopify.com?zonos=true. This will enable Hello to show up in Test Mode.
Check to see if Hello has shown up on your site. You can edit Hello’s serviced countries and placement inside the Zonos Dashboard.
Domestic and non-serviced countries will half-hide themselves or not show at all. International, serviced countries will display a floating Zonos Hello.
Getting to international checkout
To make sure international orders get redirected to the Zonos international checkout, you will need to edit the code in your Shopify theme.
In your Shopify store, go to Online Store > Themes.
Click on the Actions button drop-down menu for Current theme, and select Edit code.

Place the following attribute on all buttons you need to redirect to the Zonos international
checkout: onclick="zonosCheckout(event)"
Below are a few suggestions on how to find which buttons you need to redirect.
Open your website and place an item in your cart, then go to your cart page or open your side cart. Right-click and open Developer Tools, and Inspect the checkout button. The checkout button will have some unique attributes, e.g. “data-role”, “title”, and “class”. You can use these to find the checkout button in your theme files.
Search for the likely places the correct checkout buttons may be, e.g.
cart.liquid,cart-template.liquid,theme.liquid,sidecart.liquid,ajaxcart.liquid, orbag.liquid. You can also look at the URL to figure out which file you need or review your site’s shopping process, e.g. adding an item to the cart and where to check out on the site. For example, if you have a side cart that redirects to your checkout - in your theme files, you will want to search forsidecart.liquidorajaxcart.liquid.Below is a quick tutorial for how to search in cart.liquid.
Search for the file, e.g. “cart” for
cart.liquid, then click oncart-template.liquid.
Search for the checkout buttons, using CTRL-f for Windows/Linux or CMD-f for Mac. The example below shows what a generic checkout button would look like. Note this may vary by store.

The example below shows the attribute placement within the file. This attribute puts an
onclickmethod onto your button so when the button is clicked, the functionzonosCheckoutwill be triggered. This will take you to international checkout if Zonos Hello is set to a serviced, international country. It does not matter where you put the attribute, as long as it is within the HTML element.
Once you have inserted your attribute, click Save.
If the checkout buttons are not in
cart-template.liquid, trycart.liquidandtheme.liquid. Alternatively, you can also download the theme and use an editor to search for the buttons.
Once you’ve searched for the buttons and edited the code to redirect them to the international checkout, open a new tab and go to your store site to test and confirm the redirects are working.
Hard refresh your store page. (You may also need to clear your cache.)
Select a few different items for checkout, then go to the cart page. (Make sure you add
?zonos=truein the URL.)Check out using an international country to confirm it redirects to the international checkout. (*Note: You can check if the onclick=”zonosCheckout(event)” attribute got applied to the correct button by using Inspect Element.)
Check out using a domestic country to confirm you are still going to the domestic checkout.
Hide domestic elements for international customers
This section walks you through hiding any element that only needs to be shown to domestic customers. Some common elements to hide include features that will already be handled on the international checkout or found on the cart page.
Examples include any third-party checkout button (e.g. PayPal or Amazon Pay buttons), financing buttons, shipping estimates, and taxes.


To hide domestic elements, go to the Shopify admin > Apps > iGlobal Stores > Hide Domestic Elements.

Add an item or product to the cart, then go to the cart page.
Find the element’s selector. You can use any method, but we recommend using Inspect Element to find them. (Use a “#” for ids and a “.” for classes.)
If you do not know how to use inspect element to hide domestic, review the next section (Using inspect element to hide domestic) for instructions; otherwise, continue to the next step.

The example selectors above work for hiding the shipping estimate form, PayPal button, and Amazon Pay button for the ig-dev site. (Note: By default, the iGlobalStores’ code will hide any elements under the classes: additional-checkout-button and additional-checkout-buttons.)
Save the new domestic selectors.
Test on the site by changing the country to an international country to hide the selectors.
Change the country back to a domestic to make sure the element displays again. (Note: Use
?zonos=trueorzTestMode=true.)
Using inspect element to hide domestic
Go to your store website, then add a product to your cart. Next, go to your cart page and take note of any buttons that you need to hide e.g. third-party checkout buttons like PayPal.
The following example tutorial will show you how to hide the button labeled “Hide Me”.


Right-click the product, then select Inspect.
Your computer will pull up Developer Tools to display either on the right or at the bottom of your browser.
You can also hover over the Developer Tools to make the different sections bigger or smaller.
Make sure you are on the Elements tab, which will show you all the HTML (or content) from your website in markup.
The HTML of the button should be highlighted. Using your cursor, you can hover over the highlighted element in the Developer Tools to highlight the button.

Look at the class or id section of the button in HTML. There are three classes that define this element:
btn,btn--small-wide, andhide-this-button.Because classes can be applied to multiple elements on the page, grab the most specific class.
In this example, it is
hide-this-button, as it is not a class that can usually be applied to other uses.On your page, the element you will need to hide may be
paypal-buttonorestimate-shipping.If you need to grab an id, you would use a “#”. If you need to grab a class, you would use “.”.
To make sure the correct button class is grabbed, you need to query the selector. Go to the Console tab of Developer Tools. (Note: You can use a shortcut to get to the Console tab by hitting the ESC key.)
Write the following line of JavaScript in the Console tab:
document.querySelectorAll('');For example, to grab
class="hide-this-button", you would put.hide-this-buttonin the quotes.
If the button you input does not hide in the element, you may need to find an element that is higher up in the HTML and encompasses the element that did not work.
In this example, only one result for the
class=“hide-this-button” was found.
Next, copy the selector e.g.
hide-this-buttoninto the Shopify admin > Apps > iGlobal Stores > Hide Domestic Elements section.Once you’re ready, hit Save.
Return to your cart page and enter
?zonos=truein the URL to activate test mode.Toggle Zonos Hello from a domestic country to an international country; the button should now be hidden.
BEFORE

AFTER

Enable currency conversion
Go to the Shopify admin > Apps > iGlobal Stores, then click on the check box to enable currency conversion.
In the Shopify sidebar menu, go to Settings > General > Store currency, then click on the Change formatting link.
Change the currency format to look like below, then click Save.
HTML with currency:
<span class='money'>${{amount}} USD</span>HTML without currency:
<span class='money'>${{amount}}</span>
Immediately check the website for errors, and test to see if the currency is converting by doing the following:
Add
?zonos=trueto the URL.Switch Zonos Hello to an international country.
Troubleshooting
If some but not all currency is converting, grab the currency selectors not converting and put them in the currency selector input box located in Shopify Admin > Apps > iGlobalStores > Foreign Currency. (Note: If you do not know how to grab selectors, click here to read the tutorial.)
Find the right selectors to pass into the configuration by going to each of the different page types on your website to inspect the currency.
Grab the selectors referencing the currency. Place them within the quotation marks, separating different selectors by commas.
Make sure to add
.moneyin with the rest of your selectors (separated by commas and a space).Example:

If no currency is converting, put double quotes around the money class in the settings as shown below:
HTML with currency:
<span class="money">${{amount}} USD</span>HTML without currency:
<span class="money">${{amount}}</span>
If you are experiencing double conversion, you may have added a parent selector and a child selector - so it is converting twice.
Example:
<div class="product-price"> <span class="money">$49.99</span></div>`
Note: Make sure you only grab.moneyand not.product-priceor it will convert twice.Another possible solution is to go back to Shopify admin > Settings > General > Store currency > Change formatting link.
Remove the span element with money class to see if adding the money class was the issue.
HTML with currency:
${{amount}} USDHTML without currency:
${{amount}}
Note: Any other currency custom requests will be charged for by Zonos. The cost of the requests will be determined by the hours it takes the developer to complete.
Domestic redirect for Shopify Plus
Do not start working on this section until you’re ready to go live.
The instructions below are only applicable to Shopify Plus merchants. This section will show you how to redirect a Shopify Plus store from your domestic checkout when a customer selects an international country.
Note: Make sure you have
checkout.liquidenabled in your theme files. If you do not, you need to call Shopify and have this feature enabled. The Shopify checkout is updated twice a year. Updating may remove previous customization that Zonos has made from thecheckout.liquidfile.
In the theme files, under Snippets, select Add a new snippet.

Name the file “zonos-checkout”. Then click on Create snippet.

In the Shopify service, pull up the file called zonos-checkout.liquid. Copy the contents of this file to the zonos-checkout.liquid file you just created.
Under Layout in the theme files, select Add a new layout.
Select Create a new layout from checkout called checkout and then, click on Create layout.
Add the following script to the file before the closing
</body>tag:
{% include 'zonos-checkout' %}

Test your international checkout
If you are in test mode, ensure you include the following in the URL to make the page temporarily enable Zonos Hello code:
?zonos=trueYou can use the following if you want test mode to be turned ON the whole time you navigate to the site:
?zTestMode=trueTo turn OFF test mode when using
?zTestMode=true, use?zTestMode=false
Click the checkout button.
If the zonosCheckout() attribute is correctly placed on your checkout buttons, you will be able to reach the Zonos international checkout.
While in test mode with
?zonos=trueand?zTestMode=true, also check for the following:Confirm all items that must be hidden on international are hidden when Zonos Hello is not in US. Then, make sure the hidden items reappear when Zonos Hello is back in US.
Confirm that duty+tax gives each product a quote.
Confirm all checkout buttons get to Zonos Checkout on an international country and go to their domestic checkout on US.
Check all pop-ups and side carts.
Change the quantity of an item. Confirm that currency conversion and the checkout button still work.
Test on the mobile version of the site.
If you feel confident with your installation and have verified all tests, go to Shopify admin > Apps > iGlobal Stores > Activate Zonos and click on the Enabled radio button to make your site live.
Shopify theme change
The following instructions address what you need to do when changing your Shopify theme.
Open the iGlobal Stores app in your Shopify backend, then go to the Installation Instructions.
In a new tab, open the theme.liquid file for your new Shopify theme.
Add the iGlobal snippet to the file.

To confirm the iglobal.liquid file is present in your new theme files, go to your code editor and type “iglobal” in the top-left search bar.

If you find the iGlobal file, you are done. If you do NOT find the iGlobal file, proceed to the next step.
Go to your previous theme files.
Find the iglobal.liquid file via the top-left search bar.
Highlight all the content of the iglobal.liquid file.
CTRL-A for Windows/Linux
CMD-A for Mac
Copy the highlighted content.
CTRL-C for Windows/Linux
CMD-C for Mac
Once copied, return to your new theme files.
Under the Snippets section, select Add a new snippet, and name the file: “iglobal”.
Paste the contents you previously copied into the newly created iglobal snippet.
CTRL-V for Windows/Linux
CMD-V for Mac
Hide your domestic elements again.
Also, set your “onclick” attribute for your checkout buttons to get to international checkout.
Zonos recommends…
Ensure you ship your items DDP (Delivered Duty Paid) if taxes were paid in advance; otherwise, your customer will be billed at checkout and upon delivery.Note that orders may be delayed on import if they are in a fraud review (validating) state to make sure fraudulent orders are not shipped out.
Please note that any theme changes may “break” the current set-up. Please test once changes have been made to make sure functionality still remains.